Showing posts with label Housing and retreats. Show all posts

Cabin Update: Deck and Roof

      My apologies everyone for the severe lack of posting in the last few weeks but we have been buried with a mish-mash of events that have pushed this blog to the side. I hope to get back to regular posting here in a few weeks but I am trying to finish up a few technical aspects of this cabin and then deal with a 1,500 mile movement to the mid-west.

     As you can see here we have started the deck that will go all the way around the cabin, we have started on the side in the middle so that we could get the roof started.
      As usual we get limited by the wind and we had to stop at three sheets here, were hoping for better progress tomorrow.
      Here we have a close up of the roof material and the valley trim, we are still waiting for a decision on what the siding will be here for the third floor.
      The front angle of the cabin where you can see the 6x12 laminated beam going around the cabin, we will also have 6x6 post going from this beam to the logs that protrude at the roof line. Once we have the deck completed on the front we will also cut in the double door and the two windows that will be on the 2nd floor.
      A shot of the ceder deck that we are installing, we will also be continuing the roof line above this deck so that it is covered.
     Our other wonderful issue for the last 2 weeks has been the fire in Arizona that has been sending us this wonderful smoke I guess when 700 square miles burns you can't miss it.


Follow Prepology on Twitter

Cabin Update: Tankless, Bath, Misc.

Well we got a little bit done over the last few days including a little progress on the plumbing, we made a few changes and still have a few to do but they are minor. We have slowly been bringing up the temperature on the radiant heating that is in the floor and as I write this it is quite comfortable, it takes a while to warm up this giant heat-sink  but it will hold the heat for a good while. 
 Here is another view and obviously the LP tank will not stay here it is just temporary to get things started, we should have the permanent gas lines installed by the end of the week, I do have a few more lines to plumb in yet but they go to the 2nd floor and part of the first. 
 Another install for the day was the washer and dryer, the washer works very well and is extremely quiet and only makes any kind of noise when it drains, the dryer is not hooked up yet as it is gas but hoping for the end of the week. We did elevate the units about a foot.
In the 3rd floor bathroom we installed the concrete board counter base and also for now the copped miners sink and faucet, the tile will be next sometime down the road. This bath is now functional and will be put into use to that we can finish some things in and around the 1st floor bath area.

As always questions and comments are welcome and also we have more up on the Cabin Update Page.


Follow Prepology on Twitter

Cabin Update: Start Of The Tankless Water Heater

 It has been one of those days so please bear with it a little.

STEP 1: Locate ideal location to install a Tankless LP gas hot water heater, CHECK.

STEP 2: Bore a 5" hole through your 8" block wall that has been filled with rebar and concrete, CHECK.

STEP 3: Make obligatory hand statement and make fool of oneself. CHECK, CHECK and CHECK.
 STEP 4: Verify daylight through 5" exhaust hole and that the specialty exhaust pipe fits. CHECK and CHECK.

STEP 5: Stand around and admire hole and double check measurements to be certain the hole is in the right place. CHECK and It's too late to move it now.

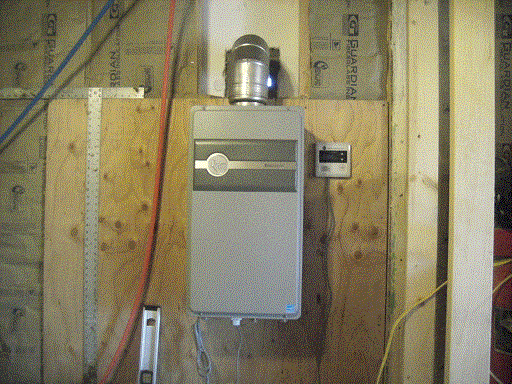
STEP 6: Install one Tankless hot water heater and temperature controller. CHECK and CHECK.

OK in all seriousness, the water heater we have installed will be for the radiant heating of the floors on the 1st and 2nd and we will also use it for the regular domestic water heating. The unit is rated at 188,000 BTU so it is on the large side for a home unit but it will work nicely for our application. we should have this unit running sometime next week but you know we'll keep you updated.


Follow Prepology on Twitter

Cabin Update: 3RD Floor Bath

 Heavy concentration this week on the third floor, with emphasis on the bathroom. Today went well as we got the commode hooked up as well as the shower. Cold water is flowing to all the fixtures except for the vanity faucet, that should come tomorrow. Hot water is another matter as we are waiting on a delivery but that should be here in a day or two if UPS decides it is important that is.
 A different view, on the left side where the pex lines are we will be using T&G as well but I am going to hinge it so there is access to the plumbing.
 Also installed today was the wraparound for the tum as well as the plumbing, tomorrow we will use silicone to do some sealing and I will install the handles.
The door was also installed today and I just need to do a little tweeking on the reveal and it will be set. Off to the right below the outlets where the insulation is we will will put OSB and then start the counter and install the sink and back-splash. We are hoping to have a really good day and wrap up with trim and the only thing left to do will be the floor (EASY) and the decision needs to be made for the counter top tile ( we will be using concrete board for now )


As always if there are any questions or comments please feel free. Additional posts of this cabin build can be found here.


Follow Prepology on Twitter

Cabin Update: Ceiling, Bath And Misc

4 out of 6 bays are now done on the main ceiling and I gotta tell you that I am really getting tired of ceiling T&G, I don't normally complain but you just can't get at a comfortable height on the scaffolding to work comfortably so on that note no ceiling work for a while, it is nice to look at though, this pic is from a different angle from the third floor.
 This is some of the work from the third floor west bedroom, we are hoping to finish this up pretty soon so we can get on to other things.
 Something new for the week, we got started on the bathroom on the third floor, it will have a full shower and a huge vanity and yes it will have T&G as well.
 I had too throw this one in, someone who will remain nameless had to fill a void with expanding foam and they went a little overboard, I love the stuff but damn it makes a mess.
Something also new this week, WINDOWS, yeah no more screwing and unscrewing plywood to let in the light anymore, This really added a sense of getting things done to add the windows and of coarse it got windy as we installed them, go figure.


Follow Prepology on Twitter

Cabin Update: Additional Ceiling Progress

 We have a little Zig-Zag progress going on as you can see and I think it looks much better than what we originally thought. We have three bays out of six done and we also started on the back wall, so far so good. 
Here is a slightly different angle and you can pick out the V, the first piece was random but the second was on purpose and it actually points to a bathroom, I couldn't resist. Anyway I will post more tomorrow or the day after if it is stands out. As always there are more pics in the Cabin Update Page and any comments are welcome.

Prepology

Cabin Update: Main Floor T&G WIth A Twist.

 Well Playtime is over and we are back to the cabin project, we have a time issue on our borrowed scaffolding so we had to jump on the main roof T&G. The original thoughts were to run the T&G parallel with the logs but with the logs being all natural they do not like to have a straight line next to them and when we put up the first two pieces we hated it so down it came and we went roughly 45 Degrees to the logs and it is turning out much better and we are going to stick with it. On the next lower section we will be reversing the pattern to make a zigzag, it should be interesting.
 Here is another angle from the ground, while we were up in the air we also go the logs wired for the two chandelier's and the fan that will go in the middle, also out of view is the location for the smoke detector. In the left hand beam we also have two light drops that will go over the island,
 For insulation we are using an R-30 and above that we are using 1" Styrofoam that is just below the flange and leaves a 7/8'S gap for the ventilation to the ridge vent.
Some dumb guy doing insulation work, the BCI's are on 24" centers so it actually goes pretty fast. As always questions and comments are welcome so please do not hesitate and you can also see previous post's of this build on the update page here.

Prepology


Follow Prepology on Twitter

Cabin Update: More T&G Progress

      I have a few pics for tonight on the great T&G adventure, as you can see we finished one wall minus final corner trim but thats the little stuff.

 The ugly in the middle is the rough frame out for the window and we are just butting all the T&G up to the window outline for now and we will complete that part when the window goes in and then trim, I did scratch my head for a minute and thought " What the heck an I gonna do here "
Two additional pics at different angles, now for the tough part someone needs to pick out a floor..

As always if there are any thoughts or comments please do not hesitate.

Follow Prepology on Twitter

Cabin Update: T&G Wall's and Ceiling

 Well the ceiling for the west bedroom is up and it is going to look very nice when it is trimmed and stained. This stuff is so much nicer than drywall and it add instant value 42 cents a square foot is well worth it.


We finally picked a pattern for the walls, we went with horizontal down to about forty inches from the deck and then we transitioned to a vertical but we went to the eight inch material that we also ordered. 


Here is a close up of the transition point and as you can see on the horizontal the tongue is down so where we transitioned to the vertical Piece I cut in a groove to accept the tongue to lock it in and it works very nice.

There is also an east bedroom and I am thinking about adding in some other accent pieces or designs so If anyone out there has any thoughts or ideas leave me a comment and ya never know.....


Have a good evening everyone.
Prepology

Follow Prepology on Twitter

Cabin Update: T&G Installation

 Evening everyone I have a short post for today but a really  good one, as promised we have some T&G up for today so you can get some idea what the ceilings will look like throughout the cabin. Shown here are the first seven rows.
We started the day off with some insulation and then transitioned into the T&G and this is where we ended up for the day at 12 rows or just about half of the room. We also plan on using some T&G for the walls as well but I wanted to get the ceiling done first and then play with the pattern for the walls. We will be adding more material all this week so you should get to see the progress pretty well and as always if there are any questions or comments please feel free to and I will get back to you.
Also for more post's on this build you can go to the update page here

Prepology

Follow Prepology on Twitter

Cabin Update: Data, Insulation and T&G

    Great day today as we had our first order of Tongue & Groove show up as well as the balance of our 4x8x1 sheets of Styrofoam. We also got out 44 bags of batts insulation in as well (R-11, R-19 and R-30) Needless to say that was a royal pain carrying almost half that insulation up two flights of stairs but it is all worth it.
 Here is a closer view of the T&G, what you see here is 1x6x16 and it is 1,500 square feet. I can't wait to install this material and we will be starting tomorrow as soon as we install a few more bags of batts insulation. We haven't decided on what color stain as of yet but it will most likely be a very light one. This T&G will be for the ceilings and we are also going to play around with it and see if we can find a nice pattern to use for the walls, drywall is strictly verboten here on this project and I totally agree as right now there is not one single piece here at all.
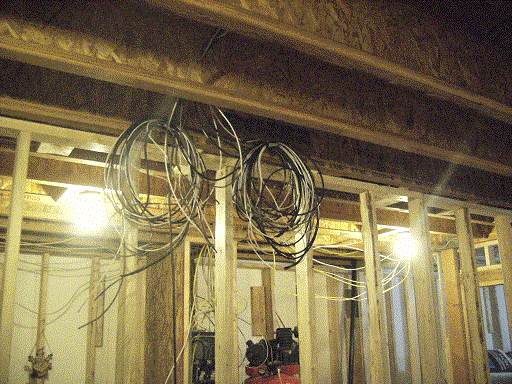
 We have also started pulling the data lines that will be for the satellite, internet as well as future telephone. The wire we are using is RG-6 for the satellite, Cat-5E for the internet ( we will also use wireless ) and CAT-3 for the telephone. We are running 2 of each to all three bedrooms and to the entertainment room on the first floor, we will also have a few other lines scattered to a few other areas but some locations have not been picked as of yet.


Kind of a bad picture here but this is one location where we will have an internet and telephone jack, across the room will be the RG-6 for the television.


Finally after we unloaded the truck and got some of the insulation up to the 3rd floor we dug right in and burned through about 4 bags of insulation (R-19 in the walls and R-30+4 in the ceiling) we still have a little to go but we will be working on the T&G but mid morning hopefully. As always if there are any questions or thoughts please feel free to comment and I will get back to you. You can also see additional posts on this cabin on the UPDATE PAGE.


Prepology

Follow Prepology on Twitter

LinkRef

free web site traffic and promotion