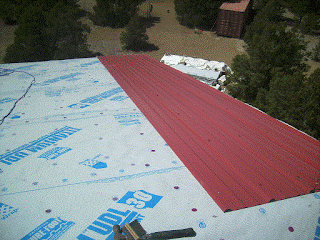
Cabin Update: Main Floor T&G WIth A Twist.

 Well Playtime is over and we are back to the cabin project, we have a time issue on our borrowed scaffolding so we had to jump on the main roof T&G. The original thoughts were to run the T&G parallel with the logs but with the logs being all natural they do not like to have a straight line next to them and when we put up the first two pieces we hated it so down it came and we went roughly 45 Degrees to the logs and it is turning out much better and we are going to stick with it. On the next lower section we will be reversing the pattern to make a zigzag, it should be interesting.
 Here is another angle from the ground, while we were up in the air we also go the logs wired for the two chandelier's and the fan that will go in the middle, also out of view is the location for the smoke detector. In the left hand beam we also have two light drops that will go over the island,
 For insulation we are using an R-30 and above that we are using 1" Styrofoam that is just below the flange and leaves a 7/8'S gap for the ventilation to the ridge vent.
Some dumb guy doing insulation work, the BCI's are on 24" centers so it actually goes pretty fast. As always questions and comments are welcome so please do not hesitate and you can also see previous post's of this build on the update page here.

Prepology


Follow Prepology on Twitter

Cabin Update: More T&G Progress

      I have a few pics for tonight on the great T&G adventure, as you can see we finished one wall minus final corner trim but thats the little stuff.

 The ugly in the middle is the rough frame out for the window and we are just butting all the T&G up to the window outline for now and we will complete that part when the window goes in and then trim, I did scratch my head for a minute and thought " What the heck an I gonna do here "
Two additional pics at different angles, now for the tough part someone needs to pick out a floor..

As always if there are any thoughts or comments please do not hesitate.

Follow Prepology on Twitter

Cabin Update: T&G Wall's and Ceiling

 Well the ceiling for the west bedroom is up and it is going to look very nice when it is trimmed and stained. This stuff is so much nicer than drywall and it add instant value 42 cents a square foot is well worth it.


We finally picked a pattern for the walls, we went with horizontal down to about forty inches from the deck and then we transitioned to a vertical but we went to the eight inch material that we also ordered. 


Here is a close up of the transition point and as you can see on the horizontal the tongue is down so where we transitioned to the vertical Piece I cut in a groove to accept the tongue to lock it in and it works very nice.

There is also an east bedroom and I am thinking about adding in some other accent pieces or designs so If anyone out there has any thoughts or ideas leave me a comment and ya never know.....


Have a good evening everyone.
Prepology

Follow Prepology on Twitter

Cabin Update: T&G Installation

 Evening everyone I have a short post for today but a really  good one, as promised we have some T&G up for today so you can get some idea what the ceilings will look like throughout the cabin. Shown here are the first seven rows.
We started the day off with some insulation and then transitioned into the T&G and this is where we ended up for the day at 12 rows or just about half of the room. We also plan on using some T&G for the walls as well but I wanted to get the ceiling done first and then play with the pattern for the walls. We will be adding more material all this week so you should get to see the progress pretty well and as always if there are any questions or comments please feel free to and I will get back to you.
Also for more post's on this build you can go to the update page here

Prepology

Follow Prepology on Twitter

Cabin Update: Data, Insulation and T&G

    Great day today as we had our first order of Tongue & Groove show up as well as the balance of our 4x8x1 sheets of Styrofoam. We also got out 44 bags of batts insulation in as well (R-11, R-19 and R-30) Needless to say that was a royal pain carrying almost half that insulation up two flights of stairs but it is all worth it.
 Here is a closer view of the T&G, what you see here is 1x6x16 and it is 1,500 square feet. I can't wait to install this material and we will be starting tomorrow as soon as we install a few more bags of batts insulation. We haven't decided on what color stain as of yet but it will most likely be a very light one. This T&G will be for the ceilings and we are also going to play around with it and see if we can find a nice pattern to use for the walls, drywall is strictly verboten here on this project and I totally agree as right now there is not one single piece here at all.
 We have also started pulling the data lines that will be for the satellite, internet as well as future telephone. The wire we are using is RG-6 for the satellite, Cat-5E for the internet ( we will also use wireless ) and CAT-3 for the telephone. We are running 2 of each to all three bedrooms and to the entertainment room on the first floor, we will also have a few other lines scattered to a few other areas but some locations have not been picked as of yet.


Kind of a bad picture here but this is one location where we will have an internet and telephone jack, across the room will be the RG-6 for the television.


Finally after we unloaded the truck and got some of the insulation up to the 3rd floor we dug right in and burned through about 4 bags of insulation (R-19 in the walls and R-30+4 in the ceiling) we still have a little to go but we will be working on the T&G but mid morning hopefully. As always if there are any questions or thoughts please feel free to comment and I will get back to you. You can also see additional posts on this cabin on the UPDATE PAGE.


Prepology

Follow Prepology on Twitter

     In response to the nasty weather that occurred this weekend I know more then a few may have been caught off guard by the event. I believe that having some type of weather alert radio is absolutely invaluable to keep informed of pending weather emergencies. Modern weather alert radios will monitor NOAA broadcasts ans with SAME technology they can be programmed to alert you in your specific county. For further information on this product as well as additional capabilities just click on the picture.

Prepology 

Follow Prepology on Twitter

Cabin Roof Update

      Well we got lucky today and had a break in the wind so we jumped on the roof and had a better then expected day. We were able to get up 10 sheets of metal roofing and we finished out the loft roof with the exception of two 1' strips that need to go on, but I will take it.


 I am standing on the lower roof here, what is left to do on the loft roof is the trim and the ridge vent, that will go right above the center white strip that you see, that will be cut out and a screen installed to keep the critters out.
On the loft roof here and you can see whats next to do, the other roof has to wait a little until we get the walkways up and the walkway roof as it ties into the lower roof, we are hoping to get into that part this next week.
     In other news we ordered about 45 bags of insulation to do the walls and ceilings along with about 16oo square feet of 6 inch tongue and groove knotty pine for the ceilings, I can't wait for this as I have been wanting to get that installed for a long time and it will really stand out in the pictures.


As always please do no hesitate if there are any questions, thoughts or what the heck's and you can always check out the update page for previous posts on the build here.

Prepology

Follow Prepology on Twitter

Storm To Touch 23+ States and Over 150 Million People

     This weekend will bring a massive storm that will touch upon almost half of the population of the United States and cover just under half of the country. Are you Prepared?

     Beginning Sunday and going through Monday night A storm cell from our southern border all the way to the north will move from west to east and will bring with it a combination of rain, hail, lightning and for some places snow. I can tell you that I am already feeling the effects of this storm with wind gusts of 40 to 50 MPH and I have some snow on the way, that is my area.

     For yourselves I would highly recommend that you plug into your local and national weather sources to see how your area may or may not be effected by this fast moving storm, After that you may wish to do a self evaluation of your stores at home to determine if you may be ready, you do not want to be that person that has to rush to the store and either fight the crowds of find empty shelves. This happens every time mother nature decides she wants whip things up on us.

     Do you have your basics covered, below is a basic check list to go over:

  • Food:  4 to 5 day supply of food that does not need to be refrigerated or need to be cooked.
  • Water: Have a few cases on hand or 2 liter bottles work well also.
  • Shelter: Is your home livable without power if it goes out? Do you have an alternate location to go to?
     Ancillary items:
  • Flashlights, batteries, AM/FM, weather alert radio.
  • Full tank of fuel for your vehicle
  • Prescription medicine, eyeglasses, woman's sanitary needs
  • Cell phone and extra battery and car charger
  • Good supply of warm clothes 
     A list can go on to the tens of hundreds of items and you should tailor it to your individual and family needs as well as the situation that may come your way, No list is ever complete and it will change as your needs change but the basics remain the same, Food, Water and Shelter.

Prepology

     It would be greatly appreciated if those of you who read this would please pass it along especially in the weather related case, Thank you.

Follow Prepology on Twitter

Wind, Rain and Where Do You Want The Lights

     OK folks for those of you wanting an additional cabin update I am sorry to disappoint but mother nature was not in a cooperative mood today so we were not able to get up more of the metal roofing. It never fails that you get all set up to do something and the weather just will not cooperate, that works with a lot of things. So on that note we jumped back into electrical and we got started on the mechanical hallway lighting, nothing special there just two round lighting boxes one for in front of where the washer and dryer will go and the other in the bay where the water boiler and pumps will go. Next we roughed in the lighting for the living room and having previously argued with the elders on " what do you want " several times I removed the decision and did it my damn way which equates to a central ceiling fan box surrounded eight lighting boxes, that should cover everything and then some. I have not included any pictures today because I am sure everyone is tired of a box int he ceiling with wires hanging out of it but if anyone really want one to put the above into context I will oblige.

Thanks all,
Prepology

Follow Prepology on Twitter

Cabin Update: Roof Begins

 Finally we had a break in the wind and we were able to start the roof metal. These sheets are 3 feet wide by seventeen feet long and have an anti heat coating. I can tell ya I have my doubts about the coating because it sure was warm to me. Anyway we were glad to be able to start this, it goes up pretty easy we used one haul line and one tag line in case a gust of wind came up but it worked out alright.
We were able to get up 4 sheets today before the wind picked up too much and made a mess, we are going to try and get lucky tomorrow and see where we can get, we have pre-drilled all of the holes so that we do not have to do it on the roof. There are about 44 screws that hold down each panel but is is not going anywhere.


As always if there are any comments or questions please do not hesitate to ask. You can also find additional post's of this cabin the the here.

Prepology


Follow Prepology on Twitter

Cabin Update, Foam Insulation, Framing, Sorry no Roof Yet.

     I have a few pictures to add for the Cabin Project, It has been pretty windy here as of late so that has screwed up putting on the metal roof but hopefully we will catch a break.


 This is the back corner of the 1st floor, we added a 2x6 wall in front of the 8x8x16 block wall and in between we have added 1" thick foam board insulation. We will also be adding R-19 fiberglass insulation in the 2x6 wall. This is also the wall that has 12" of dirt at the top and 8' at the bottom on the outside, we are going for the super insulation affect here.
 This is on the 3rd floor and we are adding the same 1" foam insulation on the ceiling but in this case we are mounting it on the bottom of the upper flange so that we vent to the center of the roof. We have also started the electrical and we are bringing up some circuits and putting in place some temp lighting since we do not have the windows in yet.
 Here is another view looking up from the stairs to the 3rd floor, I can say that the foam sure does brighten things up a little and I will be curious to see how much warmer it might be in the morning.
 Here on the first floor we started to get more of the lighting in, we are doing 3 rows, 2 rows will have a string of 4 lights on the outside and the middle will have 2 ceiling fans with light kits. We will control the 2 ceiling fan's/ lights with 4way and 3way switches since there are 4 entry ways into this room.
Here is another angle of the same room, we have again taken advantage and placed a few temp lights.
 Us adults need proper supervision hence the pooch.
End of the day doing this post, this is the 1st floor looking out from where the glass doors will be located, every one have a great evening.


For more on the Cabin Build you can go to the page where all of the other post's are located.

http://prepology.blogspot.com/p/log-cabin-updates.html
Also as always if you have any questions at all please feel free to ask away.

Prepology

Follow Prepology on Twitter

LinkRef

free web site traffic and promotion